Sign Installation: A guide to wall-mounting signs
by all | 4 February 2013 1:30 pm
 [1]
[1]Images courtesy ISA
By Bill Dundas
Installers will encounter various types of buildings and surfaces when handling wall-mounted sign projects. With a broad diversity of building structures and their corresponding sign installation conditions, these professionals need to be sure to use the proper tools and fastening practices.
Building types
The following are some common types of buildings and the most appropriate sign-fastening methods for each one.
Wood or metal-frame buildings
A sign’s weight will dictate the proper method for installing it on a frame wall composed of metal or wood members. Lighter signs—such as channel letters or signs composed of thin panels—can often be attached to fascia backing material, such as plywood, by using wood screws, toggle bolts or common screws with plastic anchors. Heavier signs may require the use of larger-diameter bolts, lag screws (e.g. penetrating wood studs) or through-bolts supported by bracing behind the wall.
Heavy signs should always be attached to wall studs or other main supports, not solely to wood or metal siding. In the sign’s proposed mounting location, however, the wall studs might not align with the positions of shop-installed mounting irons or brackets attached to the sign. So, it is sometimes necessary to relocate a sign’s mounting hardware accordingly, but always making sure to properly seal any holes that remain in the sign cabinet where the mounting irons were originally attached.
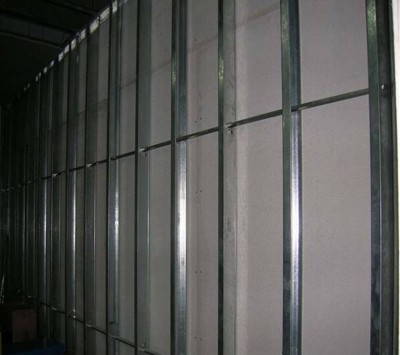 [2]
[2]A sign’s weight will dictate the proper method for attaching it to metal-frame walls.
Fastening lag screws into wooden wall supports will require a few extra precautions. The screws should be carefully located in the centres of the framing members, to avoid splitting through the sides of the lumber when inserted and tightened. A drill bit one size smaller than the lag screw diameter can be used to drill pilot holes into the lumber. This will prevent the splitting of the lumber and will also ensure the screws are guided straight into the studs when they are tightened.
Flat washers or fender washers should be used behind the screw heads to prevent the fasteners from pulling through the sign hardware. Then the job should be finished by using sealant where the lag screws penetrate the wall surface. This will prevent moisture from entering the wall interior and deteriorating the framing members.
Toggle bolts can be used as secondary fasteners for a heavy sign, as long as the sign’s weight is supported principally by fastening it directly to the main wall-framing members. If the building in question is a new construction project and the sign is heavy, it might be possible to install internal bracing to support the sign before the building’s interior wall surface is finished.
Toggle bolts, metal screws and through-bolts are some common fasteners used to attach signs to metal frame walls. For light-duty applications only, toggle bolts may be used as the principal fasteners, so long as the internal wall material is substantial (e.g. plywood or similar sheathing panels). For heavy-duty applications, including wall-projecting signs, a common practice is to install through-bolts supported by horizontal braces, like steel angles that span across the rear sides of the vertical studs.
‘Self-drilling’ screws of proper length may also be inserted directly into metal wall studs, but these types of screws are suitable only for lightweight sign installations. They are not intended for use on sign parts that need to be removed periodically (e.g. sign face retainers). In shorter lengths, these screws are suitable for fastening lightweight signs to exterior metal siding; in longer lengths, they may be used to fasten lightweight signs to metal studs or other supports behind the exposed wall surface.
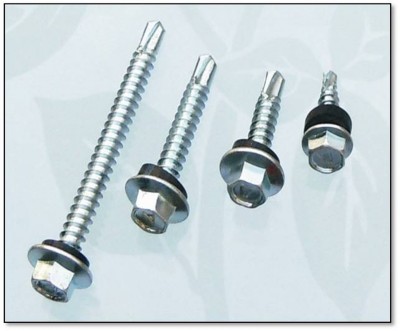 [3]
[3]‘Self-drilling’ screws are suitable only for lightweight sign installations.
The self-drilling screws are designed to be driven by an electric drill fitted with a hexagonal nut-driver bit, taking care not to overdrive the screws and strip out the holes drilled into the metal siding or supports. Flat washers or fender washers should always be used with these screws, to prevent the small screw heads from pulling through the sign materials.
Masonry buildings
Sign attachment methods for masonry will vary, based on the calculated load and the specific type of masonry surface. For instance, some so-called brick fascias are not solid masonry, but only a thin veneer that requires an alternate method of attachment. So, to avoid making a costly mistake, installers should always verify the wall composition before planning a project and selecting fasteners.
Further, it is important to use proper procedures when installing fastener anchors into the masonry. Masonry anchors should be placed into holes drilled into mortar joints or directly into the masonry, but not near the edges of bricks, blocks or masonry walls. The larger the fastener’s diameter and the deeper it penetrates into solid wall material, the stronger the connection will become.
When using lag screws and shields, a hole should be drilled that is long enough for complete insertion and tightening of the lag screw. If the screw hits the back of the hole during tightening, the anchor will be pushed out of the wall.
Special care is also called for when installing the fasteners so as to avoid splitting bricks or concrete blocks. This will include observing minimum spacing dimensions for adjacent anchors.
When using concrete screws, the installer should always verify the screws are tightly secured into the wall material. A concrete screw will cut threads into the concrete, so care must be taken not to strip out these threads when the screw is inserted.
 [4]
[4]Exterior insulation and finish system (EIFS) panels cannot support signs directly, so fasteners must instead be attached securely to the interior wall framing.
When using adhesive-type fasteners, the manufacturer’s instructions must be followed carefully, to ensure solid bonding and proper strength.
EIFS panels
Exterior insulation and finish system (EIFS) panels are used to customize the wall surfaces of many of today’s buildings, but these panels cannot support signs of any substantial weight; nor can screws, bolts or other fasteners be attached to walls composed of these materials.
EIFS panels are essentially rigid-foam panels with a hard, outer coating. If they are backed by plywood sheathing panels, then wood screws or other fasteners may be used to attach lightweight signs; but to avoid possible damage to the building surface, signs should never be tightly fastened in direct contact with the EIFS panels themselves.
The fasteners for these signs must be attached securely to the interior wall framing and adequate clearance must be provided between the sign and the EIFS surface, so the tightening of the fasteners does not compress the wall panels.
Fasteners for EIFS applications can incorporate ‘spacer sleeves,’ which are placed over the bolts to provide adequate standoff space for the sign and to prevent damage to the exposed wall surface. EIFS manufacturers recommend maintaining a minimum clearance of 12.7 mm (0.5 in.) between the rear of the sign and the wall surface. Pipe sleeves are inserted over the sign’s fasteners to maintain adequate clearance when the sign itself is installed.
A sealant should also be used, to prevent moisture penetration at the points where the sleeves and fasteners protrude from the EIFS panels.
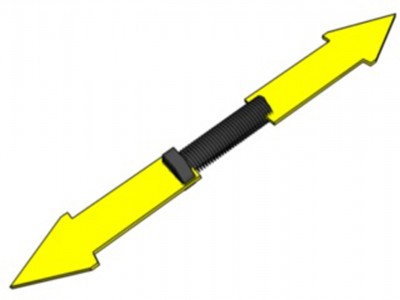
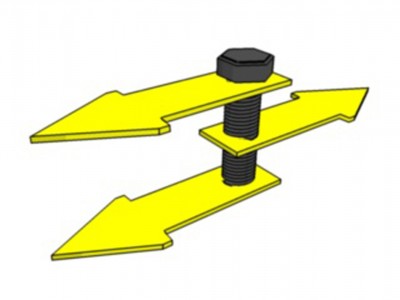 [5]
[5]Tension force (left) affects signs suspended from the undersides of canopies, while shear force (right) will affect flush-type wall signs.
 [6]
[6]
Bolt basics
Regardless of the type of structure a sign is attached to, the fasteners must withstand two basic types of force: shear and tension.
Bolts used to attach flush-type wall signs are mainly subject to shear force. A properly fastened wall sign becomes integral to the building wall itself; for this reason, tension or pullout force is not a significant factor. For suspended-type signs that are attached to the undersides of canopy structures, however, tension force represents an important factor.
Building codes may specify minimum sign-fastener sizes for certain applications. The use of engineered fasteners or alternative fastening methods may also be specified by the customer. So, it is always important to confirm in advance whether or not a particular method will be specified for a given project.
Further, the project specifications or jurisdictional regulations may also determine the type of fasteners that will be acceptable for use. The International Building Code (IBC), for example, specifies a minimum fastener size of 9.5 mm (0.37 in.) in diameter and 127 mm (5 in.) in length when attaching signs to exterior masonry, concrete or stone walls.
Engineered fasteners are rated by the manufacturer for specific load values, as verified by lab testing. Non-engineered fasteners (e.g. lag screws and toggle bolts) are not engineered and their load values are not specified. Instead, the load capacity of lag screws and other types of wood screws is variable, depending on the specific type, thickness and condition of the wood into which the fastener is inserted.
 [7]
[7]When using concrete screws, the installer needs to verify they are tightly secured into the wall material.
The ultimate load rating for a particular fastener or anchor is four times the fastener’s adjusted safe capacity. For example, a lag screw rated for 181.4 kg (400 lb) of ultimate capacity is suitable to support about 45.4 kg (100 lb). Ultimate capacity is also known as ‘proof test load.’
The mounting hardware furnished for wall sign installations generally incorporates bolt-hole sizes that dictate the use of fasteners that will be of adequate size to support the sign’s weight. Typical lag screw or machine bolt diameters for sign fastening applications range from 9.5 to 15.9 mm (0.37 to 0.63 in.).
Since wall signs and letters are typically fastened at multiple points, a sign’s total weight must be divided by the number of fasteners to determine the load rating for each fastener. For example, a 226.8-kg (500-lb) sign attached at six points would require each fastener to support approximately 37.6 kg (83 lb).
Using the right fasteners and installation techniques for a particular wall structure can keep a sign safe and secure for many years to come.
Bill Dundas is director of technical and regulatory affairs for the International Sign Association (ISA). This article is adapted from ISA Sign Academy online training resources. For more information, visit www.signs.org/online[8].
- [Image]: http://www.signmedia.ca/wp-content/uploads/2014/02/Picture3.jpg
- [Image]: http://www.signmedia.ca/wp-content/uploads/2014/02/metal-frame-building-2.jpg
- [Image]: http://www.signmedia.ca/wp-content/uploads/2014/02/tek-screws.jpg
- [Image]: http://www.signmedia.ca/wp-content/uploads/2014/02/EIFS.jpg
- [Image]: http://www.signmedia.ca/wp-content/uploads/2014/02/Bolt-Shear-Force.jpg
- [Image]: http://www.signmedia.ca/wp-content/uploads/2014/02/Bolt-Tension-Force.jpg
- [Image]: http://www.signmedia.ca/wp-content/uploads/2014/02/tilt-up-concrete.jpg
- www.signs.org/online: http://www.signs.org/online
Source URL: https://www.signmedia.ca/a-guide-to-wall-mounting-signs/