
All you need to know about banners
The next process is finishing, including the addition of reinforcement between the layers:
- Fold the banner face to face, such that the printed surfaces are facing each other, i.e. backwards (see Figure 4). Stitch the bottom edge 25 mm (1 in.) up from the cut line; this is equivalent to the bleed that was included in the file for printing. The result will resemble an inside-out printed tube.
- Flip the tube outside-in (see Figure 5), so the graphics end up on the outer surface and the seams on the inner surface, where they will be protected from the sun’s ultraviolet (UV) rays.
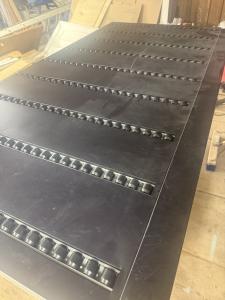
- Sew up the sides, stopping shy of the ends, so as to leave an opening for the pocket. Reinforce the sides by inserting seatbelt webbing in between the two layers (see Figure 6), where it will be covered up. Make sure the webbing is looped through the pocket and back down to itself, so the entire pocket is lined.
- Sew the pocket line (see Figure 7) and the job is done.
It is important to note a back-to-back double-sided banner should never be rolled. Doing so will crease the inside layer, resulting in a damaged appearance. Instead, it should only be loosely folded.
Finishing street banners
It often seems like street banners are a mystery, given the dozens of different ‘engineered’ methods—most of which are either too weak or too complicated—to finish banners before they are hung over a street.
Ropes and grommets are not sufficient. The best method is to remove the wind load from the banner material and transfer it to something stronger, such as the aforementioned seatbelt webbing.
This method is quite simple:
- Finish the banner with a webbing-reinforced hem. A 51-mm (2-in.) wide webbing is recommended.
- Attach metal D-rings to the webbing on all four corners of the banner.
- Attach aircraft cable to the D-rings and fasten it to the pole or other mounting structure.
This way, the wind load is taken off the banner, which on a good day could probably withstand about 90 kg (200 lb) of force, and transferred to the webbing, which can take anywhere from 227 to 907 kg (500 to 2,000 lb) before it breaks.
Wind slits
Another common line of questioning concerns cutting wind slits into banners. These are also referred to as ‘wind holes’ or ‘pressure-release valves.’ Signmakers wonder how many they need to add to an outdoor banner to reduce wind resistance—and thus increase the banner’s stability in wind—and where they should be positioned along the material.
The short, sweet and simple answer is, “Don’t do it.” Wind slits are little more than a way to destroy an otherwise perfectly good banner.
Most banner materials are made with an inner scrim of polyester fibre, which adds most of the strength to the white outer polyvinyl chloride (PVC) film that gets printed. The moment a cut is made through the banner, the material is immediately weakened. The reduction in wind resistance is minimal, but the damage is extensive. And some testing has shown wind slits actually increase drag on a banner.
Engineers have found the reduction of wind resistance achieved by cutting slits into the average banner is approximately three per cent. Better to simply reduce the banner’s size by three per cent and get the same result, avoiding the potential issues of cutting into the material.
Sign up for our newsletter
Featuring breaking news from Canada's sign and graphics industry.
Products

Read the Latest Issue

