Digital Signage: Best practices for deployments
by all | 19 February 2016 10:38 am
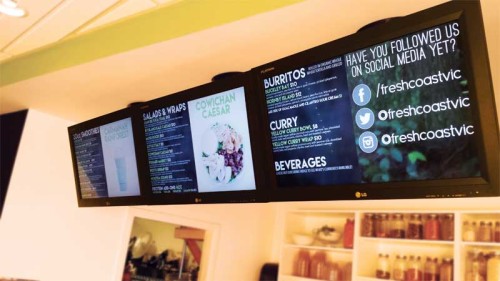
Photos courtesy ENS
By Jeremiah Archambault
Finding success in the rapidly growing medium of digital signage is a little bit like skydiving: while it may be a fun, exhilarating experience with a lot of really cool-looking gear, if one were to begin without a plan, some training, some testing of that gear and a predefined target, the outcome could be disastrous. Yet, the ‘look before you leap’ approach has been relatively uncommon in the digital signage industry. Many vendors and clients rush in without determining a logical process to take them from start to finish.
The following are some ‘best practices’ based on past digital signage deployments, to help sign shops achieve their goal of satisfying the client and earning continuous revenues from successful projects.
1. Source technology that works well for the location
To ensure both digital signage hardware and software will deliver on their promise, it is important to test them together before installing them at a client’s location. Of course, it is also important to ask what the client wants.
The most common screen sizes are 0.8, 1 and 1.4 m (32, 42 and 55 in.). While there are also many smaller and larger options, the popularity of these sizes means it is easier to source cost-
effective mounting brackets for them. Similarly, the client should be asked how the screens will be oriented. Portrait mode (vertical) tends to yield much higher viewership than landscape mode (horizontal), but care must be taken to order commercial-grade screens designed to display in portrait orientation. Landscape-friendly screens, by comparison, are almost priced as throw-away items, even those that can last for many years.
The easiest installations are those on flat walls, which can use flat or tilt mounting brackets. The next easiest are corner installations, which require articulating mounts instead. The mounting surface itself must offer sufficient reinforcement to accommodate the additional load.
Ceiling mounts are trickier. The client may not know what is above the ceiling tiles, so it is important to check the suitability of mounting spots early on. This way, unexpected cost overruns can be avoided; there is nothing worse than quoting a $50 flat bracket only to discover a $500 custom pole mount is actually needed because of a false ceiling.
With all of this in mind, it is important to survey the site with an actual walk-through prior to quoting the job. For multi-site rollouts, including national networks, the client will need to confirm all locations have the same layout. If not, the project budget will have to be adjusted to accommodate multiple walk-throughs and, potentially, different mounting hardware for different locations.

Hilton’s Doubletree Hotel in Victoria streams ultra-high-definition (UHD) ‘4K’ video content in real time from a roof-mounted camera to a video wall comprising three 1.4-m (55-in.) panels in portrait mode behind the reception desk. Guests say they enjoy the panoramic views of the city’s inner harbour and downtown core.
2. Plan for connectivity and power needs
Network connectivity and power supply are among the most important and often overlooked requirements. Larger corporate clients, if notified in advance, can often ‘move’ power and networking to the intended mounting spot, enabling a hassle-free installation.
Most smaller businesses will skip this step and ask for their digital signage to be plugged into whatever systems are already on-site. In these cases, the signage provider should determine how both power and networking will be made available to the screen(s). Otherwise, there could be support request calls every time there’s a power hiccup, the router needs rebooting or the Internet service provider (ISP) has an issue.
Indeed, power and networking are the most important elements of the site survey. Many retail stores, for example, have networks that are ‘locked down’ by their point-of-sale (POS) terminal provider or their information technology (IT) team, so it is important to bring along a networking cable and notebook computer to verify access for the digital signage network, e.g. via Wi-Fi. Large corporate customers usually have an in-house team responsible for approving any devices connecting to their networks. For smaller businesses, it may be even easier to arrange approval in advance with their IT contact.
3. Quote the job carefully
Everyone wants and needs technology, but few want to pay for it. If the signage provider quotes much over cost for hardware and software, the client may go elsewhere for a cheaper system. It is better to consider all such components—including screens, media players and mounting brackets—as sundry items and mark them up only marginally over cost, then carefully itemize each step required to complete the process. This way, the client is paying for expertise, not for the goods delivered.
Service-related line items with profit margins may include project management, site survey visits, networking co-ordination, installation, training, graphic design, ongoing servicing and surveillance. Noting the ongoing costs upfront, especially, will help avoid any potential animosity later.
If the purpose of the project is digital out-of-home (DOOH) advertising, some clients will want to work out a payment plan that involves matching ad revenue, while others will ‘co-op’ expenses with their vendors. Both scenarios can sometimes work, but the signage provider needs to protect itself. The best approach is to quote all hardware costs upfront and collect payment before shipping.
Some requests for proposals (RFQs) require signage providers to carry the cost of the hardware. This can be a heavy burden if the project goes sideways.

The easiest screen installations are on flat walls, but it is still important to survey the site with a walk-through before quoting the job.
4. Plan the procurement
In today’s age of just-in-time delivery, distributors hold as little hardware as possible in inventory, so it is important to check they have the volume available for the scale required. National digital signage deployments have fallen apart because no one bothered to check first whether the manufacturer had enough stock to roll out.
Most such hardware at a large scale can be expected to take six to eight weeks for delivery. After all, suppliers will need to ramp up manufacturing when a project calls for hundreds or thousands of commercial-grade screens.
For the first install in a large network, the hardware should be shipped directly to the signage provider for in-house ‘staging’ before rolling out to client locations. Thereafter, however, hardware should be shipped directly to the sites, if possible, to reduce the signage provider’s liability. Otherwise, hardware broken in transit without clear lines of responsibility can become expensive.
Also, even when screens, brackets and media players are ordered from a single distributor, they will often arrive from different sources, so it is important for someone on-site to be aware of all the parts and organize them for installation.
5. Book the installation
Installers must have a detailed, clearly defined procedure for dealing with the hardware, including details gleaned from the site surveys and any correspondence with the client. While many traditional signs can be installed during normal work hours, digital signage is particularly popular within retail environments where installation is only possible after hours, with tight job windows. Most challenging are quick-service restaurants (QSRs), where any unforeseen delays can materially affect their business (i.e. if their menus are down).
Also, there usually isn’t enough room for complete staging before actual installation. So, it is imperative for the install team to understand the scope of work in advance. If possible, it is also a good idea to ask for the client’s own IT technician to be on-site for the installation.

Portrait-mode screens tend to enjoy higher viewership than landscape-mode displays.
6. Ensure an accountable installation
The hardware should be powered on and checked for quality of operation before proceeding with the actual installation. Any breakage thereafter is a liability for the installer, not the shipper.
Where possible, the person who conducted the site survey should also install the hardware. It is important to come fully equipped: some cabling will likely need to be concealed; the crimp end of a networking cable will probably need recrimping; it is common for a High Definition Multimedia Interface (HDMI) cable to fail; and extra extension cables and cords can come in handy.
One element of installation that is often overlooked is photography. The process should be documented by taking photos of the make and model of the screen, the media player (so the client knows what it looks like when it needs resetting), progress during installation and the completed job.
The installer, too, should be accountable in terms of confirming the job is complete and all of the gear is working as required before he/she leaves the location. If there is a delay or failure, he/she must provide clear reasons and explain exactly when it will be addressed.
7. Train the client
There are usually three levels of training required. The first is for the graphic designer, ideally provided access to the digital signage software well in advance. The second is for the on-site subject matter expert (SME), who will be given a hardware walkthrough to learn how to reset the media player, screen and router without issues. The third is for any management personnel who will provide project oversight. Most cloud-based digital signage software allows for remote monitoring through a management dashboard. In larger companies, it is often the marketing department that takes on this duty.
8. Follow up
Like skydiving, digital signage has a risk of catastrophic failure, so it is a good idea to complete a post-installation recap.
If the hardware is going to fail, it usually does so within the first few weeks of operation. So, a post-mortem should be scheduled with all stakeholders about three weeks after the installation to confirm their satisfaction with the results. This also clearly defines when the responsibility of the installer has ended and when the ongoing warranty and servicing will start.
While many early adopters of digital signage—including large banks, retailers and QSRs—have already completed their installations, the medium now represents a ‘long tail’ industry heading toward mass adoption. Soon, just about every business will have screens on its walls, whether to showcase products, messages or events. With some forethought, planning and stakeholder involvement, signage providers can be at the forefront of this massive opportunity.
Jeremiah Archambault is president of Victoria-based ENS, which oversees large-scale digital signage deployments. For more information, visit www.thedigitalsign.com[1].
- www.thedigitalsign.com: http://www.thedigitalsign.com
Source URL: https://www.signmedia.ca/digital-signage-best-practices-for-deployments/