Getting printers back to top form: Five steps to revive production
by | 20 August 2020 11:26 am
By Bryan Ballreich
 [1]
[1]With the current crisis, many machines have been sitting idle for long periods of time. This simple variation in operating frequency can potentially cause mechanical issues, which can be avoided with the right routines.
Liquid-ink printing devices are designed to be in continuous production—that is what makes them the preferred technology
of sign and graphics professionals across the globe. With the current crisis, many machines have been sitting idle for long periods of time. This simple variation in operating frequency can potentially cause mechanical issues, which can be avoided with the right routines.
As businesses reopen, the following tips can help print service providers (PSPs) get their inkjet devices ready for production.
1. Empty the waste tank
 [2]
[2]Image 1 shows the waste cartridge on the lower right side of an advanced large-format digital printer/cutter
Image 1 shows the waste cartridge on the lower right side of an advanced large-format digital printer/cutter, while Image 2 shows the waste cartridge inside the right cover of a benchtop ultraviolet (UV) printer. These devices will still continue to drain waste ink during the automated cleaning cycles, even during long periods of non-use. Waste ink that exceeds the capacity of the waste cartridge will eventually overflow and, in some cases, may cause mechanical damage. To avoid these issues, empty the waste tank before leaving the device dormant for any length of time, and again before starting to print.
2. Check and agitate the ink cartridges
Depending on the ink type and the manufacturer’s recommendation, it is important to gently remove the ink cartridges one by one and agitate them slightly. This will mix the liquid completely and counteract any possible settling.
 [3]
[3]Image 2 shows the waste cartridge inside the right cover of a benchtop ultraviolet (UV) printer.
This step is particularly important for white-ink cartridges as most white inks are thicker than other ink types, and the coloured components within them can settle and separate over time. Settling can also occur in the ink lines that run from the cartridge to the printhead, the reservoirs above the printhead, and even in the printhead cap and exit tubes. Therefore, it is recommended white-ink machines undergo a rigorous cleaning and printing exercise after long periods of inactivity.
 [4]
[4]Before initiating any automated cleaning, print service providers (PSPs) should perform a manual maintenance routine.
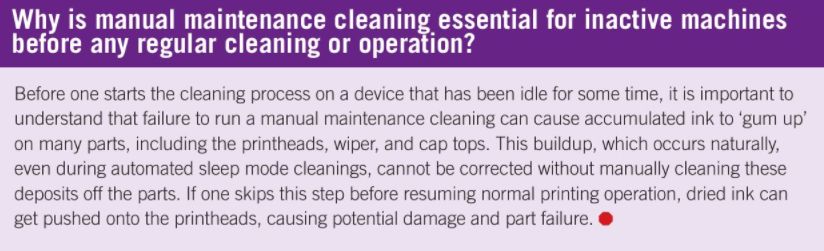
3. Perform a manual maintenance cleaning process
Before initiating any automated cleaning, PSPs should perform a manual maintenance routine. Depending on the device, one may need to consult the printer’s operations manual, or simply follow the steps provided in a self-guided user menu. In any case, the process will require operators to access potentially fragile components, so it is critical they take their time and follow each step carefully.
1) Press the function button on the menu system.
2) Use the directional arrows to locate the manual cleaning command.
3) Press the enter button to activate the process.
 [5]
[5]When prompted, open the left service door of the Roland DG inkjet printer by pulling downward.
Instructions will be automatically displayed on the front panel screen. Follow the steps to manually clean the device.
i) When prompted, open the left service door by pulling downward.
ii) Remove the metal flange in the service bay by taking out the single thumb screw at the far-left top edge and pulling the flange toward the front of the printer.
iii) Gently pull the printhead from the right side of the bay into the service area by dragging it to the left until the lower light-emitting diode (LED) lights are shining up at all the printheads.
iv) Dip a foam-tipped swab into the cleaning solution that came with the device.
v) Gently wipe around each printhead with the swab until all the deposits of ink and debris disappear, leaving a shiny metal surface.
 [6]
[6]Remove the metal flange in the service bay by taking out the single thumb screw at the far-left top edge and pulling the flange toward the front of the printer.
vi) If any other dust or contaminants are visible on any part of the printhead, gently wipe it down with a clean, dry foam-tipped swab.
vii) Push the printhead back out of the service bay to the right. Then replace the metal flange by aligning all three metal tabs into their respective slots, followed by a gentle push to the right-hand side of the machine. Next, align and replace the thumb screw. Then press the left service door upward until it reaches its magnet closure.
viii) Now open the service door on the right by pulling it downward.
ix) Dip another foam-tipped swab in the cleaning solution and gently wipe the black rubber O-rings that cap each printhead.
x) Check the wiper for any residue and gently clean it with the swab.
 [7]
[7]Note that substantial amounts of dried ink have collected around each printhead. If this is not cleaned, the ink will prevent proper printhead capping.
xi) Inspect the service bay, and remove any other debris with a clean cloth or another dry foam-tipped swab.
xii) Close the right-side service door by pulling upward until it reaches its magnetic closure.
The automated cleaning system will now perform a regular cleaning.
 [8]
[8]Dip a foam-tipped swab in the cleaning solution and gently wipe the black rubber O-rings that cap each printhead.
4. Test the printheads and clean as needed
Once the debris have been manually removed from the printheads, capping station, wipers, and other components as directed by the operations manual, it is time to test and prime the printheads for normal operation.
Load the media for a cleaning test print. This is a critical step and should be performed regularly to check the condition of the printhead nozzles. Ideally, every outlet should be open and firing, with no signs of deflection (when ink is misdirected by contaminants around the nozzle opening). Sometimes, however, the test will show missing nozzles, deflecting outlets and, in cases where the capping station is not properly aligned, a partial or complete printhead failure to fire.
Should the cleaning test show any missing or deflecting nozzles, start by performing a normal cleaning (refer to the operations manual) and print another test. Repeat this sequence with increasing levels of cleaning (i.e. medium or powerful cycles) until the nozzles are firing correctly. Note: If the printer has been inactive for a long period of time, one may need to perform medium or powerful cleaning for the nozzles to fire properly.
5. Print several known test images and review results
After the cleaning and printhead test is complete, one can print several known test images and check for consistency.
Modern liquid-ink devices use sophisticated methods to maintain print consistency, but long periods of downtime may require users to ‘exercise’ the equipment before it regains its former imaging stability.
 [9]
[9]The black streak in the printed image indicates there is dust or debris collected at the bottom of the printhead that needs to be removed with a foam-tipped swab.
Ideally, one should start by printing large, full-spectrum graphics that will require every printhead to fire simultaneously. This will begin the process of clearing older ink from the lines, head dampers, printheads, and cleaning systems. Each of these components has specific tolerances and is built to expect a certain ‘flow.’ When they are not being used as much, it may take several prints before all the units settle back into their respective tolerances.
This is a good time to carefully assess the output quality, as the print itself can usually help to diagnose any mechanical issues. For example, white stripe banding typically occurs when the media feed calibration is too high, which can be fixed by adjusting the setting to a lower value. If the printed image shows an irregular pattern or distortion, then the printhead carriage is probably set too high for the media and needs to be lowered. Colour banding is usually caused by missing print nozzles and requires additional cleaning of the outlets.
By following these tips, PSPs can bring their digital printing equipment back to top form and ensure superior output.
 [10]
[10]
Bryan Ballreich is a studio production manager at Roland DGA and has more than 30 years of print production experience. For more information, visit www.rolanddga.com[11].
- [Image]: https://www.signmedia.ca/wp-content/uploads/2020/08/Opener-Ballreich.jpg
- [Image]: https://www.signmedia.ca/wp-content/uploads/2020/08/printer_maintenance_02.jpg
- [Image]: https://www.signmedia.ca/wp-content/uploads/2020/08/Image-2-Ballreich.jpg
- [Image]: https://www.signmedia.ca/wp-content/uploads/2020/08/printer_maintenance_03.jpg
- [Image]: https://www.signmedia.ca/wp-content/uploads/2020/08/printer_maintenance_04.jpg
- [Image]: https://www.signmedia.ca/wp-content/uploads/2020/08/printer_maintenance_05.jpg
- [Image]: https://www.signmedia.ca/wp-content/uploads/2020/08/printer_maintenance_08.jpg
- [Image]: https://www.signmedia.ca/wp-content/uploads/2020/08/printer_maintenance_10.jpg
- [Image]: https://www.signmedia.ca/wp-content/uploads/2020/08/printer_maintenance_12.jpg
- [Image]: https://www.signmedia.ca/wp-content/uploads/2020/08/8-20-2020-11-14-20-AM.jpg
- www.rolanddga.com: https://www.rolanddga.com/
Source URL: https://www.signmedia.ca/getting-printers-back-to-top-form-five-steps-to-revive-production/