
Illuminated Signs: How to optimize LED sign photography
By Robert Blyth
Given that signmakers produce—and thus define—their customers’ commercial image, they should make sure they have the best-quality photos of their past work as a sales tool for future jobs. All too often, however, as they complete the installation of a landmark pylon sign, they simply take out a smartphone and begin snapping a few photos, trying to capture the job when it is only partially completed. This tendency is far from ideal.
Certainly, with the explosive growth of smartphones with integrated cameras, signmakers and other professionals now have the ability to instantly take photos wherever they may be. And today’s smartphones may appear to rival many of yesterday’s digital cameras, with up to eight-megapixel sensors, digital zooming, fixed apertures and variable International Organization for Standardization (ISO) sensitivity. No wonder more photos were taken in 2011 than in all previous years combined since the invention of the camera—and the number has doubled every year since!
Unfortunately, smartphones also tend to capture highly compressed photos that may range from fair to vivid, but are often rather unclear. This is why it is important to use a good digital camera instead.
Telling stories
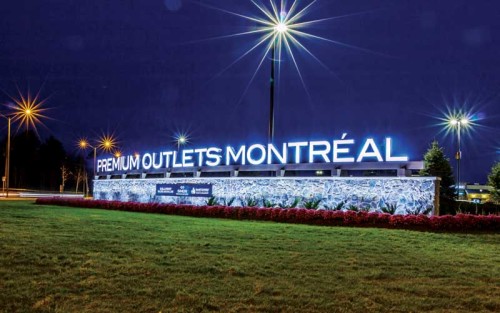
In today’s competitive marketplace, signmakers need a portfolio of photos of their successful past projects to provide visual examples of their capabilities to prospective customers. And to really show the quality of their work, these photos need to be large, sharp, top-quality files without grain or flaws.
Each photo of a sign or display should tell its own particular story. Industry awards for signs, after all, are usually won based on the merits of photos of those sings. And every signmaker should compile the largest, most complete photo library possible.
Despite the advances in camera technology for smartphones, they remain highly limited in their capabilities. Even a small digital camera today will be far better at taking high-
quality photos than any phone.
Also, signmakers who don’t feel comfortable taking photos themselves should consider hiring local amateur photographers instead. This can be a very cost-effective way to build a professional-looking portfolio. And it may be essential if a sign is to be shipped a far distance and installed at its site by outside contractors.

Taking perfect pictures
Once equipped with the right camera, the next step is to compose the shot. Any distractions and other ‘visual pollution’ around and behind the sign should be avoided as much as possible. This means situating the camera so as to isolate the sign in the frame. A cleaner background will help emphasize the sign as the photo’s central focus.
This is why it is better to wait until after the installation, rather than take photos at the last stages, at which point it may be difficult to avoid including installers and/or their vehicles in the shot. It is also ideal to wait a few days after installation, if possible, before photographing the site. This will allow any landscaped ground to settle.
It may be possible to shoot from a creative perspective of the sign, such as from the top of a boom truck. When shooting from a distance with a zoom lens, the background can be blurred by using a wide-open aperture, which will also help emphasize the sign as the focus of the image.
The photos should never be taken under direct sunlight, which is too harsh and can wash out the sign’s colours. To achieve optimal lighting, it is better to take photos before dawn or at dusk. Both sunrise and sunset are known as the golden hours. Light rain and overcast conditions will, in most cases, enable the truest of colours to come through in the photos.
If the sign is illuminated, another option is to shoot at night with long exposure times—i.e. from five to 15 seconds—and very small aperture settings. This will provide the greatest depth of field and the sharpest image.
Photos should also be shot in the lowest ISO light sensitivity setting possible with the camera when used in conjunction with a tripod. This will help minimize grain the resulting photo(s).
Sign up for our newsletter
Featuring breaking news from Canada's sign and graphics industry.
Products


Read the Latest Issue

