
Installation
To a large degree, Pate’s career as an installer and educator has focused on improving the efficiency of the wrapping process. He says this is not so much a matter of speed as of preventing failures and optimizing quality.
“Quality and durability have to come first and about 80 per cent of the game is knowing how best to squeegee, cut and heat the graphics,” he says. “Fleets are a great way to become efficient through sheer repetition. And starting with the right tools is the best way to reduce mistakes.”
Beyond squeegees, cutting knives and heat guns, Pate recommends application gloves, a tool belt, an edge sealer, stud magnets and a ‘micro-squeegee’ for tucking vinyl under rubber. And as wrapping can be strenuous, he suggests keeping one’s health in mind, too.
“I treat wrapping like a sport, so I keep water and powders on hand to keep my electrolytes up and snacks for energy,” he says. “Keeping in good shape allows you to wrap a lot of cars.”
Once the vehicle has been cleaned with soap, water and a 70 per cent isopropyl alcohol for degreasing (anything stronger could risk hazing the paint), Pate recommends wrapping in this sequential order: hood, roof, sides, back, mirrors, door handles and bumpers.
“There are times to wrap fast and key points where you need to slow down,” he says.
As mentioned earlier, temperature is an important factor when wrapping. A vehicle normally parked outdoors in the winner should be stored indoors the night before wrapping to allow it to warm up.
“If possible, use a portable heater to direct the warm air to speed up the process,” says Mactac’s Yard. “It is also a good idea to keep the printed graphics in a temperature-controlled environment, pulling them out just when they are needed.”
Pate says the ‘sweet spot’ is above 16 C (60 F) and below 24 C (75 F)—any colder and the film can become stiff, brittle and difficult to stretch, any warmer and it can become gooey and tacky.
“For the same reason, avoid applying too much heat with the gun,” he says. “If you understand the film and use technique, you can use less heat to achieve a solid wrap. The best installers constantly learn and get better because they are open to new tools, techniques and films. And they always look for efficiency because it can come from unexpected places.”
Maintenance
After a wrap is installed, maintenance can make a difference in how long it lasts. The adhesives should first be allowed to cure for at least three days before hand-washing the vehicle or a full week before machine- or pressure-washing.
“When cleaning, use soft cloths and non-abrasive cleaners to avoid damaging the wrap,” says Mactac’s Yard, “and if you’re using a polish or wax to enhance the lifespan of the wrap, use only vinyl-friendly products.”
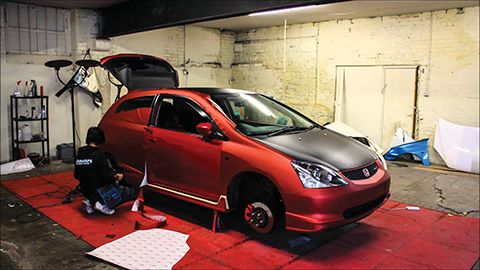
There is a growing market for restyling cars with colour-change films. Photo courtesy GStar Wraps
Restyling
One growing area of the wrap business involves restyling customers’ cars with colour-change films, which have become available in an ever-wider variety of colours and finishes. While this type of work can provide a new revenue stream for sign and graphics companies, it requires a very different mindset.
“A commercial wrap is usually for the purpose of advertising, turning a vehicle into a ‘moving billboard,’” says Ritchie Daize, automotive sales representative for film manufacturer Arlon Graphics. “The most important aspects, in order of priority, are utility, longevity and curb appeal. So, it should be as easy to install as possible. A colour change wrap’s the opposite; curb appeal is the most important factor, followed by longevity and finally utility. It’s a fashion accessory. People don’t need it, they want it.”
“In the last five years, colour-change wraps have really changed the market with a different approach,” says Pate. “You don’t need a printer or a laminator, it’s like a business in a box, but the wrapping takes longer and if you rush it, it’s easy to make mistakes.”
While a commercial graphic wrap typically takes eight hours (or less than five for Pate), Daize estimates three to five days are needed for a full restyling wrap.
“So, customers may need to leave their car at the shop for a week,” he says. “The work involves the same basic skills as commercial wrapping, but the films are thicker and every detail needs to emulate an original equipment manufacturer (OEM) automotive finish. The most difficult and time-consuming is a chrome wrap. And to achieve a perfect paint-like finish, you have to leave no evidence of the original paint colour.”
With that in mind, it is all the more important before wrapping to remove the side-view mirrors, antenna, bumper and other ‘hardware,’ as the customer will expect the entire vehicle to display a uniform colour afterwards.
“I use professional mechanics for that work the night before the wrap, then have them put everything back on afterwards,” says Pate. “It’s what they’re trained to do and that leaves me with more energy for the installation.”
“Some colour change experts dismantle cars down to the basic body,” says Daize. “The further you go, the greater the liability and the cost for labour over the course of the week.”


